

Laying Foil On Top of Insulation on the Attic Floor
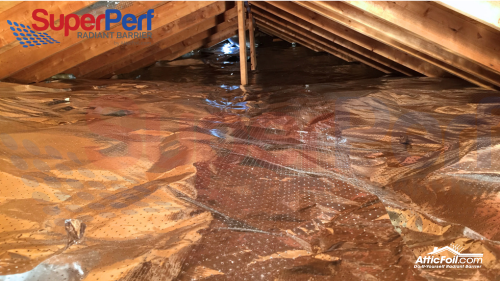
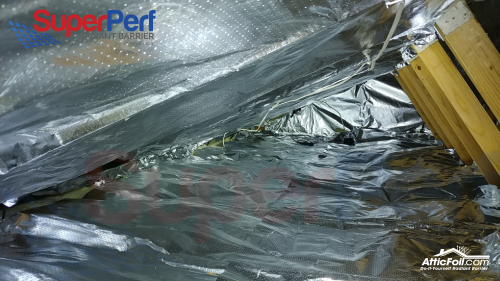
This is probably the easiest method to install Radiant Barrier AtticFoil™: lay the foil out over the existing insulation on the attic floor. This method can be used in any climate, though it has historically been most popular in colder climates. This installation process is usually pretty simple and quick in most attics. Typically, two people can easily install radiant barrier in an average-sized home in just a few hours.
For any climate where radiant barrier is being installed on the attic floor over insulation, we recommend our SuperPerf™ product, which is designed for maximum breathability and performance.
The reason this method is so impressive is that a radiant barrier makes regular insulation more effective. Installing foil on top of the insulation acts like the windproof shell on a jacket. The SuperPerf foil helps minimize convective looping within the insulation. By minimizing airflow within the insulation and minimizing radiant heat loss/gain from your attic, a radiant barrier will make your home more comfortable and efficient overall. Watch the video below to learn why you need to do this immediately to stop the biggest energy mistake in your home.
TIP
Before getting started check you insulation levels and determine if you need to add more insulation before you add the foil.
Prep: Measuring, Cutting & Getting Started
Choose the Right Product. For truss-type attics, the best product to use is the 26″ wide AtticFoil®. This is easy to do and makes a truss install go much faster. You can "super perforate" it yourself with a drill and a 1/8" drill bit; drill lots of holes from the outside through the core of the roll. If you don't have trusses, use the 45" wide SuperPerf™ roll.
Count your rafters in the attic. Using either a measuring tape or just counting, count the rafters in your attic space along one slope of the roof; rafters are usually 24″ (or 2 feet) apart. After you count them, add about 12 inches to your final number to make sure you don’t run short.
Cut pieces outside the attic. The best way to cut the SuperPerf is to cut several pieces at a time in a large open area. Measure the distance from the center of the attic under the ridge to the edge of the outside walls. Then pre-cut the pieces to fit this length. You can use these pieces to work sections. After you cut several pieces, have your helper bring the pieces of foil up into the attic.
Review the instructions completely. There are some pros and cons to this method, so we recommend that you read the information we have compiled on The Best Radiant Barrier Install Method before you decide which method to go with. Also, please take time to read the warnings at the bottom of this page regarding installing foil directly over attic insulation in cold climates.

Step 1: Start at the Farthest Corner
Start in a far corner and start rolling out the foil over the insulation; this works best when you use the pre-cut pieces. Another option is to pull the foil into the corner.
Start at the furthest point (from the attic entry) and work towards the exit. Inside each truss, push one piece from the center to each side. Then proceed to the next truss opening. Remember, you do not have to tape the foil together; the pieces of foil will usually overlap one another by a couple of inches.
If you have large, open areas in your attic consider this trick: cut the foil on your driveway (or yard) and then tape 2 or 3 pieces side by side to make either an 8′ or 12′ wide piece. This will form one large piece of foil that will cover more area, more quickly. For example, if you make a piece 20 feet long and 12 feet wide, you can cover an area of about 240 square feet very quickly. Just roll the foil up like a big rug, take it into the attic and roll it out. It’s that simple.
TIP
If an area is hard to reach in the attic, use a pole, PVC pipe, or a 1×2 board with a nail taped on the end. You can easily stab the foil and move it far back into hard to reach areas with this homemade "poker."
Step 2: Overlapping Pieces
Overlap the foil sheets about 1-2 inches and use small pieces of foil tape to attach the pieces together. It is not necessary to attach the pieces, but many people will do this to hold the foil together. If you need to get to something below the foil, just undo the tape and slide the foil to the side.
Do not push the foil down into the attic insulation.
The foil works best and is most effective if there is about a 1″-2″ gap between the foil and the top of the insulation. So, just lay it out nice and easy. Your insulation has little peaks and valleys in it, usually these little peaks work perfectly to keep most of the foil a little bit above the insulation. If you have batt insulation, try purchasing an extra batt and tearing it into golf ball sized chunks and sprinkle them over the batts to create peaks and valleys. When you installation is done, the foil should only have about 5-10% actual contact with the top of the attic insulation.
Step 3: Obstacles and Special Considerations
Cut around supports, braces and other obstacles; it does not have to be perfect or pretty – small gaps in the foil are OK. Just cut a slit, wrap the foil around the obstacle and use a small piece of foil tape to tack it back together. Try using a “Double-T” cut to make the foil lay flat around obstacles.
Vaulted/Cathedral or Tapered Ceilings: You might have an area with a ceiling that tapers down and is very hard to reach. Just tape a couple of pieces of foil together and let it roll down into the hard area to reach. Then, use a pole with a nail to push it around until it covers the area intended.
Attic flooring/decking: Yes, you can install the foil directly over your existing attic floor decking, it can handle light to moderate traffic. Just be sure to pull the foil nice and tight to avoid anyone tripping and mark the outline (with tape or spray paint) of the decking if it doesn’t cover the whole attic, that way you will know where it ends so you don’t accidentally step off the edge and through your ceiling.
Step 4: Finishing Up
Remember, don’t cover up or block your soffit vents when you’re laying the foil down. Good attic ventilation is important because air moving through an attic helps keeps the air temperatures cooler and helps to remove moisture. Once you’ve finished the large open areas, go back and attempt to cover any smaller or hard-to-reach places in the attic that you skipped over. You don’t have to cover every square inch of the attic for the foil to work. AtticFoil™ has a cumulative effect, so partial coverage still works!
Did You Know?
You can add AtticFoil™ on top of your existing plywood floor, but you can not cover the foil with anything else. This includes another sheet of plywood, insulation, storage, etc.
Why?
Because then there is no air gap above the foil. When you eliminate the air gap, the foil is useless to block radiant heat.
You need an air space on at least one side of the foil for it to work.
You can’t sandwich the foil between two objects and still call it a radiant barrier.
Warnings for Installing in Cold Climates
Check for air leaks in the ceiling. Although we have super-perforated radiant barrier foil, there is a potential for moisture to condensate if too much warm moist air is leaking out through the ceiling of the home. In areas of cold weather, this can not be emphasized enough. Can lights, fixtures and attic doors are the main culprits of air leakage. These leaks should be sealed up before installing foil or left uncovered if you can't seal them. More info here: Sealing Can Lights in Your Attic
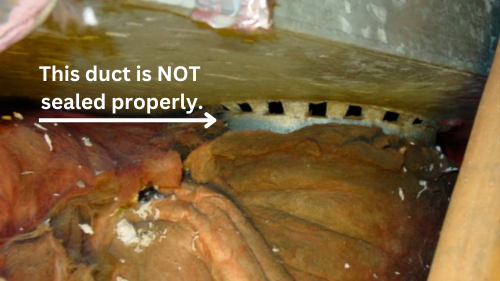
Check for duct leakage. If your home has leaky duct work, this can put the home under positive pressure. Since positive pressure pushes air out of the home, even a small hole can allow a lot of warm-moist air to get pushed into the attic. The best thing you can do to make sure you have an optimally performing attic is to air seal!
Moisture concerns? SuperPerf™ AtticFoil™ is punch-perforated and extra permeable so a good amount of moisture can get past it, but too much moisture can exceed the foil’s limits, and it will not be able to keep up (allow) the insulation to dry out. Radiant barrier foil does not cause moisture. If you are installing the foil over a standard sheetrock ceiling with no holes/penetrations, then the foil will handle any residual moisture vapor passing through.
Do not compress your insulation. This will reduce the drying potential for the insulation, and reduce its overall effectiveness.
Lay the radiant barrier foil loosely over the attic insulation. Do not press it into the insulation. Your insulation will have some peaks and valleys, which is fine. Ideally you want about 10-20% surface contact with the foil.
Note on Can (Recessed) Lights
Using IC-rated (insulation contact) recessed can lights is critical for both fire safety and energy efficiency because these fixtures are specifically designed to operate safely when surrounded by insulation. Older non-IC can lights can reach very high temperatures, and when insulation—including AtticFoil products—is placed too close, heat can build up and create an opportunity for condensation to occur between the foil and the light. We recommend you use the right products to cover and seal these lights, and then add your R-value insulation over them. Then you will lay the SuperPerf™ on top of that.
If non-IC fixtures are already installed and cannot be replaced, it’s essential to cut the insulation back to the manufacturer-required clearance (3" away on all sides) and maintain a safe air gap around the fixture. Failing to create this clearance can trap heat and cause moisture to form because of the cold surface of the foil, leading to poor performance and other possible issues.
More Info here: How to Seal Can Lights

Need a Different Width SuperPerf™ Roll?
You can “super perforate” any of our Original AtticFoil rolls on your own using a tiny drill bit and drilling through the roll while it’s still rolled up.
We recommend you use a 1/8” size drill bit (or smaller) and drill several holes about every 2" square in the roll before you unroll it. Then, once you are ready to install, you will unroll it and you will have larger holes throughout the surface. You can install this DIY version of SuperPerf™ over your attic insulation, following the guidelines and warnings above.

Did You Know?
Foil radiant barrier does NOT cause moisture. For more info on managing moisture in your attic read our page on Moisture & Radiant Barrier Foil.
If you’d like to see some examples of successful attic installations where the foil was laid on top of the insulation, check out our customer DIY Project Gallery.