
This method also keeps heat in during cold months.
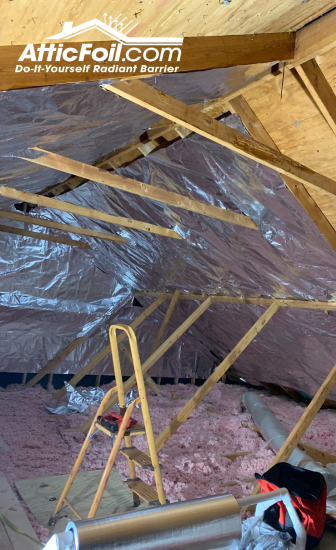
This method is the best way to install radiant barrier in a cathedral (vaulted) ceiling for comfort and results YEAR ROUND. This covers keeping heat out during summer time (hot months) and helping hold heat in during winter time (cold months).
One of the most frustrating problems is having comfort issues with a particular room in your home. These are rooms that you can never get quite cool enough no matter how hard you try. The usual suspects are: rooms over garages, bonus rooms, media rooms, master bedrooms that stick out from the house, and home offices. For more tips on how to keep these rooms cool, read: Making Bonus/Above Garage rooms more comfortable.
TIP
AtticFoil® is your first line of defense against radiant heat gain through the roofline, so it should be the layer closest to the roof, with the air gap.
Keeping the Heat Out of Cathedral Ceilings
In hot/mixed climates, the primary goal is heat rejection. For this reason, the radiant barrier is most effective when placed closest to the outside of the assembly. So your foil layer is closest to the roof, to block that radiant heat before it absorbs into anything else in the cathedral ceiling.

Step 1: Creating the Required Air Gap
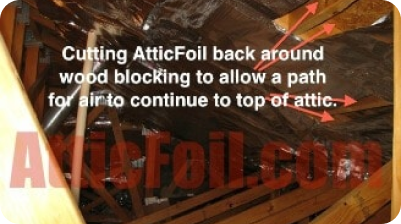
All radiant barriers require an air gap to block radiant heat, no matter what side its coming from. If you are going to add insulation to the assembly, then the main goal is to ensure the air space is not compromised when the insulation is added.
Measure the distance between each rafter to make sure you know the correct measurement. Make sure you account for enough overhang that the foil can be attached to the sides of the rafters.
If you want, you can pre-cut the foil into strips to fit between each rafter bay to save time.
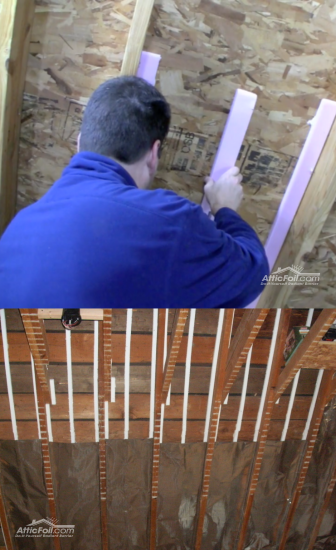
Cut the foam board into 2-3 inch wide strips – either 4 foot strips or 8 foot strips, whichever is easiest.
Then, attach the foam strips in between the rafter bays with Liquid Nails. You need to put 3 foam strips between each rafter bay; one on each side and one down the middle. The one in the middle will prevent the radiant barrier from losing the air space when pushed on by the insulation. *In some cases just 2 strips will do.
Can you just forego the strips? We don't recommend it but if you can ensure your insulation won't be able to push the foil to the decking, then this would work too.
TIP
AtticFoil® 26" Wide is designed to be used on trusses/rafters that are spaced 26" apart, center to center. If this is your spacing, use the 26" wide. If it's different, consider a custom cut roll to another size.
Step 2: Adding the Radiant Barrier Foil
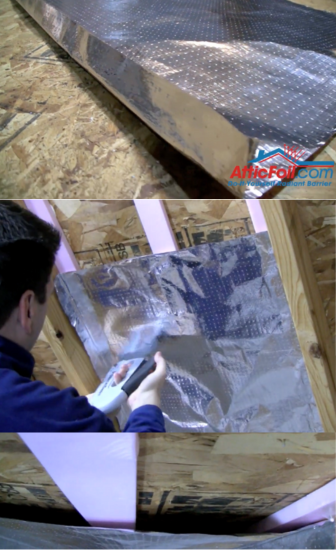
Now cut your AtticFoil® to fit the rafter bays (typically 16-24" OC) with enough to overlap on the rafters.
Take a straight edge and make a fold the foil over it to create a tab edge on the foil that you will staple to the sides of the rafter.
Place the edge on the side of the rafter and secure it with 3 to 4 staples.
Pull the foil across the foam strips and create the second tab on the other side simply by folding the foil with your fingers. Staple this side up to the rafter side to secure it in place.
Now you have the following layers in the assembly: (coming from the top, down) roof deck, foam strips (for air space and ventilation channel), and the radiant barrier foil.
Continue on all the rafter bays until you are finished.
Then, use some air conditioning tape and tape the seams where the foil is overlapped, to make sure that none of the air from the air channel you created escapes and gets into the insulation. Once you finish sealing the seams, you’re ready to install your batt insulation.
Step 3: Adding Traditional Insulation (R-Value)
If you are adding traditional insulation to the assembly, now is the time to do so. You can fill the cavities with standard batt insulation or you can go with blown in insulation or even foam board.
Typically an R-19 will fit in the rafter bay (you might have to compress it a little because of the spacers). Some customers even stack another rafter (or spacer) on the rafter ends to deepen the cavity; this is not required, but can be useful when it comes time to add insulation.
Then you can sheetrock the wall, or add whatever material you are finishing up with. See CUSTOMER PHOTOS of Cathedral Ceiling Installations.
Vaulted Ceilings Over a Non-conditioned Space
If you have a non conditioned space (meaning you are not heating and cooling the space) you do not need to add traditional insulation. An example of this is an attic space that you're just wanting to hang up plywood or drywall to make a finished storage space.
In this case, the installation becomes very simple and basically the Staple Up Method and then you cover it with your finish. Start at the bottom and work your way up stapling horizontally across the bottom of the rafters from end to end.
If you have trusses, then install vertically on the bottom of the trusses.
Continue this pattern until you have covered the entire assembly from bottom to top, making sure each run of foil overlaps the previous run by at least 2 inches.
Once the wall is completely covered with the foil, simply attach the ceiling finish directly over the foil.
The foil is able to work in this set up because you have about 6 inches from the deck to the back of the foil stapled on the rafters. The radiant heat will meet the foil and then be reflected back towards the roof.