

Flat Top Install

For Tall Attics with a High Ridge
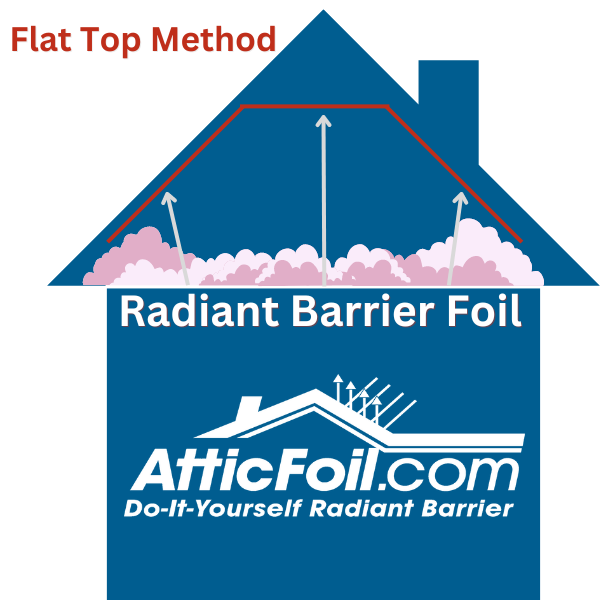
The Flat Top method answers the question, “How am I going to get foil way up to the top of my attic?” The good news is you don’t have to get the foil to the top of the attic for it to be effective; it doesn’t really matter if the foil is 6 inches or 10 feet away from the roof—the foil will still reflect the heat. We developed the Flat Top method to make installations in tall attics easier, faster, and safer.
This method is the ideal radiant barrier installation method for both high-pitch, hard-to-reach attics and standard-type attics. The basic system involves creating a false ceiling that will act as a flat surface to hold radiant barrier foil across the top part of the attic. This makes access within easy reach for even the tallest attics.
You will essentially create a room within the attic made of radiant barrier reflective foil ad cut some holes/slits in the "ceiling" of the AtticFoil® to allow for any warm air under the foil to escape past it. Combined with proper attic ventilation, radiant heat will be reflected back towards the roof. Ventilation from the soffits to the ridge (highest point in the attic) will allow the heat to escape out. Even on the hottest days, the space within the foil cavity should be just a few degrees above outside temperature.
TIP
This method is a great way to add foil in a super tall attic without the need for a ladder or scaffolding.
Prep: Measuring, Cutting & Getting Started
Most of the install process is like the open ridge, standard Staple Up Method, but with a few modifications. For this method, it is best to start at the top and then work your way down toward the eaves (this is opposite of the standard Staple Up Install Methods).
To determine how much AtticFoil® you need for this install, do your calculations based on the staple up method, since you will follow the pitch of the roofline. Even though you're not installing all the way up to the peak, you are still bridging across from one slope to the opposite, so almost the same amount of product will be used across the span.
For this type of install, we recommend either the 48" wide best-selling, or the 60" super wide AtticFoil® radiant barrier foil.

TIP
Many customers who have very tall attics will use a step ladder on a platform and take the foil ceiling up to about 8-10 feet, to provide extra storage space in the attic.
Step 1: Create the Base of the Ceiling/ Flat Top with Bracing/Strapping
The first step is to create some form of grid or false ceiling to support the foil in the flat area. Remember the foil is not that heavy, it is about 5 ounces per 100 square feet. This is about the weight of a heavyweight blue painters tarp, so you can use just about anything to support the weight of the foil: wood, wire, warehouse strapping, duct strapping, bungee cords, etc.
The best height is usually about 7 feet off the attic floor. For most attics this will be above the duct work and allow you to reach the foil without using any ladders.
The easiest way to make the grid is to purchase some metal duct strapping (with or without holes – it doesn’t matter) from your home improvement store, or you can get it from and air conditioning supply company. It is thin metal, cuts easily and it can easily screw into the roof rafters.
Other grid materials can be: nylon duct strapping, wire, wood, or rope. Just about anything that can be pulled across the attic and fastened to the rafters will work. Many contractors use heavy-duty strapping material used to wrap boxes and crates. You can get it at www.uline.com, www.grainger.com, www.globalindustrial.com, or you can check local hardware stores.
Make sure to measure the distance down the slope to the soffits. Depending on the steepness of the roof, 3 rows of foil might fit perfectly (12 ft). You can adjust the height of the Flat Top to meet the top of the foil on the slope. This can save materials and having to cut the foil.
Don't overthink it - it doesn't have to be perfect or pretty to work. You can even crisscross straps if needed. You just want something to hold up the foil. The main thing is to just try to get all the strapping fairly level so your foil will end up level. Start each strap by attaching one end of the strap to the rafter bottom and pulling it across the attic to attach to the other side, while you do this, try to keep it level.
TIP
Use 1⁄4″ hex head screws about 1-1⁄2 inches long and a magnetic nut driver with a cordless screw gun. This way you can use one hand to hold the strap and one hand to hold the screw gun without the screw falling out.
Step 2: Adding the Foil to the Strapped Ceiling
Use our 2" wide Foil Tape to secure the foil to the first strap.
Then run the foil all the way across the grid and let it hang loosely.
Use a helper to pull the far end of the foil tight. Go back to the second strap and tape the foil to that strap. Keep tension on the foil so it is taut and continue to tape the foil to all the straps until you reach your helper at the other end of the space. This method will keep the foil straight, tight and neat. Install other pieces on the flat top and overlap them a couple of inches until the flat part is done.
Remember: you do not need to tape the seams unless you want to make it look cleaner. Taping the seams has no impact on the performance of the product.
Step 3: Cutting Ventilation Holes
Ventilation in the flat top method is a MUST. Regardless of the type of ventilation you have (or even if you don’t have any!) you should still ventilate the top of the install. Even more so if you have a whole house fan or an upper and lower attic with air flowing into the upper part!
You should cut a few holes (or slits) about 1 square foot each, to allow air to move properly and to promote good ventilation. With this method a triangular pocket is formed above the Flat Top part. Heated air will from the roof line will pool and collect in this pocket and find its way out of your top exhaust vents.
If your bathrooms fans vent into the attic (which is a bad idea by the way), you should also cut some holes in the flat top around that vent area to allow moisture to travel out of the attic. Even though the foil is perforated, it’s never too much to have air flowing, especially when moisture is a potential concern.
Step 4: Cold Climate Venting
If you live in a cold climate, you should definitely cut several holes in the top of your Flat Top method. Additionally we recommend you add some cuts/slits in the foil around the lower part of the roof too.
In colder climates good attic ventilation is imperative to prevent moisture from the home from condensing when it meets the cold layer of foil.
Of course the best way to prevent moisture is to seal up any and all leaky areas on the attic floor to stop air from inside your home from leaking into your attic.
Did You Know?
Foil radiant barrier does NOT cause moisture. For more info on managing moisture in your attic read our page on Moisture & Radiant Barrier Foil.
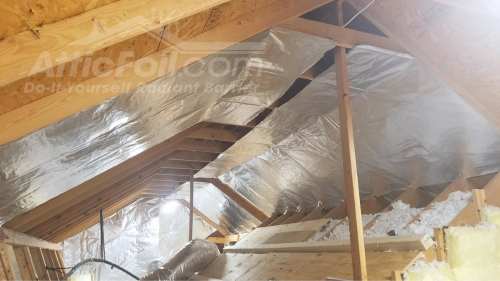
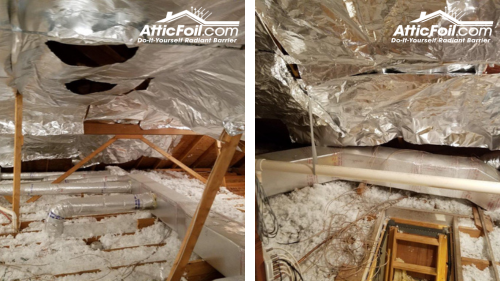
If you’d like to see some examples of successful attic installations where the foil was installed with the Flat Top Method for tall attics, check out our
customer DIY Project Gallery.