

This method also keeps heat in during cold months.
Installing a radiant barrier in the walls is done just like the cathedral ceiling method. When you are trying to block heat from coming in, it is best to have the foil closest to the outside layer as possible, while still maintaining an air space on one side of the foil. If you are remodeling a wall that shares exterior sheathing, read below for the typical instructions on a retrofit/remodel application.
If you are doing NEW construction, you should really consider utilizing a radiant barrier house wrap OUTSIDE the wall, between the brick/stone/siding and exterior sheathing. For more information on house wrap see: Radiant Barrier as a House Wrap.
The exterior of a west facing wall can reach over 150º on a hot-sunny afternoon. Typically the wall absorbs the radiant heat from the sun and heats up. Then, this heat travels by conduction through a wall made of wood and insulation. The problem exists in that traditional insulation only slows down heat flow by conduction, it does not stop heat.
The goal is to force the heat to CONVERT to radiant form (radiant heat), so that you can REFLECT it back to where it came from. The best way to make the heat convert to radiant heat is to make it cross an air space.
TIP
This method is the same layers as the Cathedral Ceiling Method except the airspace will be “dead air” instead of ventilated.
It will not damage the wall to have this area unvented.
The Layers of Insulation
In hot/mixed climates, the primary goal is heat rejection.
The exterior of a west facing wall can reach over 150º on a hot-sunny afternoon. Typically the wall absorbs the radiant heat from the sun and heats up. Then, this heat travels by conduction through a wall made of wood and insulation. The problem exists in that traditional insulation only slows down heat flow by conduction, it does not stop heat.
The goal is to force the heat to CONVERT to radiant form (radiant heat), so that you can REFLECT it back to where it came from. The best way to make the heat convert to radiant heat is to make it cross an air space. This is why the radiant barrier is most effective when placed closest to the outside of the wall.
Step 1: Creating the Required Air Gap
All radiant barriers require an air gap to block radiant heat, no matter what side the heat is coming from. If you are going to add insulation to the assembly, then the main goal is to ensure the air space is maintained when the insulation is added.
Measure the distance between each stud to make sure you know the correct measurement. Make sure you account for enough edging that the foil can be attached to the inside sides of the stud cavities.
If you want, you can pre-cut the foil into strips to fit between each stud bay to save time.
Cut the foam board into 2-3 inch wide strips – either 4 foot strips or 8 foot strips, whichever is easiest.
Then, attach the foam strips in between the studs with Liquid Nails. You need to put 3 foam strips between each rafter bay; one on each side and one down the middle. The one in the middle will prevent the radiant barrier from losing the air space when pushed on by the insulation. *In some cases just 2 strips will do.
Can you just forego the strips? We don't recommend it but if you can ensure your insulation won't be able to push the foil to the exterior sheathing, then this would work too.

TIP
In hot or mixed climates, you want your radiant barrier to be the first line of defense against radiant heat, and the regular insulation to be the second line of defense against conductive heat flow.
Step 2: Adding the Radiant Barrier Foil
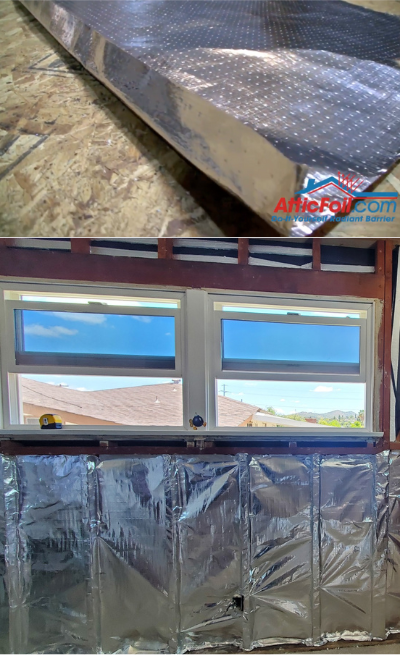
Now add AtticFoil® to fit the stud cavities (typically 16-24" OC) with enough to overlap on the inside of the studs.
Take a straight edge and make a fold along the edge of the foil to create a tab edge on the foil. You will use that to staple your foil to the sides of the stud.
Place the edge on the side of the stud and secure it with 3 to 4 staples.
Pull the foil across the foam strips and create the second tab on the other side simply by folding the foil with your fingers. Staple this side up to the inside of the stud to secure it in place.
Now you have the following layers in the assembly: (coming from the outside in) exterior sheathing, foam strips (for air space), and the radiant barrier foil.
Continue on all the stud cavities until you are finished.
Then, use some foil tape and tape the seams where the foil is overlapped, to make sure that none of the air from the air channel you created escapes and gets into the insulation. Once you finish sealing the seams, you’re ready to install your insulation.
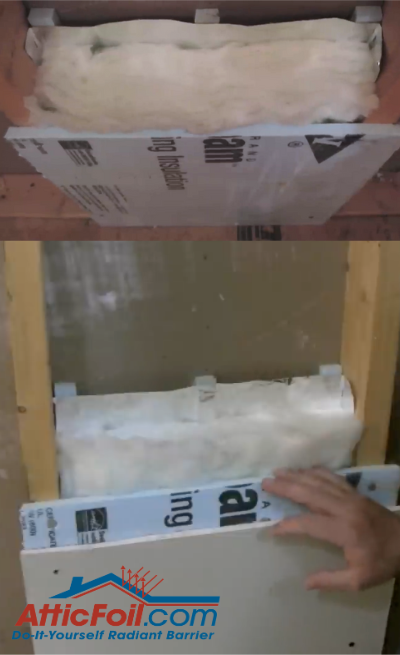
Step 3: Adding Traditional Insulation (R-Value)
If you are adding traditional insulation to the assembly, now is the time to do so. You can fill the cavities with standard batt insulation, blown-in insulation, rigid foam board, or spray foam.
Typically an R-13 will fit in the cavity (you might have to compress it a little because of the spacers). Some customers even stack another furring strip (or spacer) on the stud faces to deepen the cavity; this is not required, but can be useful when it comes time to add insulation.
Here are the layers (from the exterior to the interior) as they should be installed:
- Brick/stone/siding
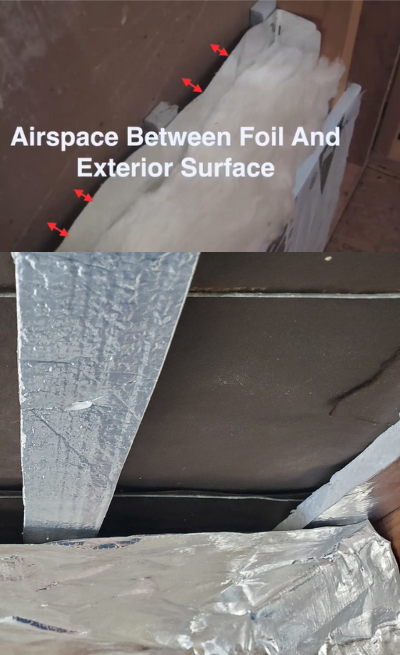
- Exterior sheathing
- AIR SPACE – created by using foam strips to separate foil from exterior sheathing. You MUST have an airspace for a radiant barrier to work.
- AtticFoil™ Radiant Barrier Foil – Perforated, not solid
- Standard insulation with R-value to reduce conductive heat flow.
- Interior Sheetrock/drywall
- Inside of the home/building
For Added Performance of the Wall
For an extra air-tight wall, we recommend two additional materials: adding a layer of foam board and using caulk between layers.
You can use ½” or ¾” foam board BETWEEN the studs and the sheetrock. Roofing nails with a large head to hold the foam board in place before you finish with your sheetrock work well. Basically you will install the foam board like sheetrock and then install the sheetrock using longer drywall screws so you can make it through the foam layer too.
Adding the foam board to the assembly does several things:
- adds R-value
- helps air seal the wall
- reduces thermal bypass
- sound/noise reduction
Finish this optional upgrade by adding a bead of caulk on the face of the studs before the foam layer (or before the sheetrock layer). Be sure to caulk between the bottom plate of the wall to either the concrete slab or the subfloor to reduce air leakage under the wall as well.
You will be amazed at how little heat will get through a wall built using this method.
For similar installation instructions, see Installing Radiant Barrier in a Cathedral Ceiling to Keep the Heat Out.